2017년 5월 27일 토요일

memory management - 메모리 관리 기법

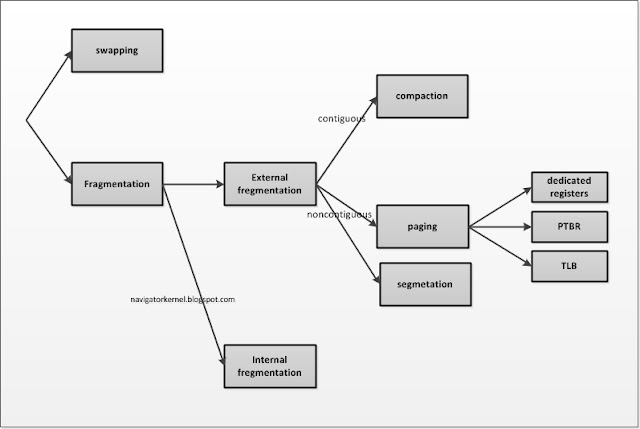
memory management strategies - 메모리 관리 기법 아래는 Operating System 에서 사용되는 메모리 관리 기법을 도식화하였다. 각 항목에 대해 다른 사람에게 간단한 설명이 가능한 수준으로 이해하고 있어야 할 기본적인 개념이다. 아래편으로 각 항목에 대한 간략한 설명이 있으며, 자세한 설명은 Operating system 책을 참고하자.

swapping external fragmentation internal fragmentation compaction paging segmentation

1. basic concepts

  1. logical address (=virtual address) : an address seen by CPU
  2. physical address : an address seen by memory unit
  3. MMU : runtime mapping from virtual to physical addresses

2. swapping : 현재 수행되지 않는 프로세스에 대해 임시로 메모리에서 보조 저장장치(backing storage)로 옮겨두는 기법

3. fragmentation

  1. external fragmentation : 전체 메모리 공간은 충분하나, 작은 사이즈 단위로 모두 쪼개어 여러 공간에 분산되어 있는 상태로 연속적인 공간 할당이 불가능한 상태
    1. compaction : 파편화된 메모리 공간을 모아서, 하나의 큰 메모리 공간으로 만드는 것. dynamic relocation이 가능한 경우에 실행 가능한 기법
    2. paging : 페이징은 physical memory를 고정된 PAGE SIZE 단위로 나누어 관리하는 기법이다. logical memory는 page 단위로 나뉘며, 이 동일 크기로 physical memory는 frame 단위로 나뉘어 관리된다. page를 frame으로 mapping을 시켜주는 정보를 page number와 page offset으로 구성된 page table에 넣어 저장/관리한다. 페이징의 하드웨어 구현 방법
      1. dedicated registers : 매우 빠르나 page table이 작은 경우만 가능
      2. PTBR : page table을 main memory에 저장하고, PTBR로 가르킴. page table이 memory에 존재하여, 접근 시간이 상당히 소요됨
      3. TLB : fast-lookup hardware cache를 사용. 최근 사용한 page table만 캐싱하여 저장함. 접근 시간이 빠르나, TLB hit/miss에 따른 접근 시간 차이가 발생
    3. segmentation : 메모리를 바라보는 사용자 관점을 그대로 지원하는 메모리 관리 기법이다. 즉, logical address space을 논리적인 블록 단위인 세그먼트들의 집합으로 정의한다. C컴파일러의 경우, 코드, 전역변수, 힙, 스택, 표준 C라이브러리와 같은 세그먼트를 가진다. 세그멘테이션은 각 segment 별 영역을 segment base와 segment limit으로 이뤄진 segment table로 표현/관리한다.
  2. internal fregmentation : 고정된 블록 사이즈로 메모리를 할당할때, 당연히 요청된 메모리 사이즈보다 큰 메모리 할당이 일어나게 되고, 이 차이 분의 메모리 공간은 실제로 사용되지 않게됨. 이 사용되지 않는 공간을 의미.

Navigation of this blog:이 블로그 한눈에 보기

.

2017년 4월 20일 목요일

Coarse-grained vs Fine-grained Multithreading

Scheduling 관련 문서나 논문을 읽다보면, Coarse-grained 와 Fine-grained 용어가 나오는 경우가 있다. 사전적 의미만 가지고는 그 의미 유추가 힘들어서, 한번 정리를 해보았다. Multithreading 에서의 Coarse-grained 와 Fine-grained 개념에 대해 알아본다.

Multithreaded processors 개념은 여러개의 thread를 동시에 실행시키는 것이다. 이렇게 하면, latency를 숨길 수 있다. latency를 숨기다는 것이 어떤 의미인지, 예를 들어살펴보자.

Thread A의 동작을 상상해보자. Thread A는 정해진 동작을 수행, 어느 순간 cache miss가 발생할 것이다. 이때, 메모리에 데이터를 로드하는 동작을 수행하게 된다. core level 에서는 DRAM으로 data를 요청하고, 대기하게 된다. DRAM에 data를 로드하는 데까지, 상당 시간이 흘러갈 것이다. 이렇게 long-latency가 포함된 동작이 실행된 경우, 그 latency 동안에 다른 thread를 실행할 수 있다. DRAM에는 data 로드를 요청해두고, processor는 해당 작업이 완료될때까지, Thread B를 실행하는 것이다. Thread B를 수행하다가 다시 Thread A로 돌아가면 DRAM 로드가 완료되고 작업을 이어서 할 수 있을 것이다. 이렇게 Thread A->B를 이동하면, latency가 발생해도, processor 입장에서는 동작을 계속 할 수 있다.

thread의 실행을 교체하는 것을(Thread A 실행 -> Thread B 실행) context switching 이라고 한다. 이 context switching 자체도 다소 큰 overhead 가 발생하므로, context swtiching을 언제/어떻게 수행할 것인지도 큰 설계 고려사항이다.

Multithread Models 는 크게 2가지 방법으로 분류한다.

1. Coarse-grained Multithreading (block interleaving)
사전적 의미로 coarse는 "(피부나 천이) 거친, (알갱이?올 등이) 굵은"의 뜻을 가지고 있다. Multithread Models 에서의 coarse 의 의미는 촘촘하지 못한 것을 의미하며, Multithreading 동작이 큰 단위로 발생한다는 것을 암시한다. Coarse-grained Multithreading은 위에서 언급했던 memory stall 등과 같은 long latency 동작이 발생할때까지, 동작 중인 thread를 계속 동작시키는 것이다. long latency 이벤트가 발생하면, context switching 이 수행한다. 따라서, Coarse-grained Multithreading은 context switching이 상대적으로 적게 발생한다.

2. Fine-grained Multithreading (cycle-by-cycle interleaving)
사전적 의미로 fine은 "(알갱이가) 고운"으로 사용되었다. Multithreading 동작이 촘촘하게(작은 단위)로 발생한다는 것을 암시한다. Fine-grained Multithreading은 thread switching이 cycle 단위로 발생한다. cycle 단위로, 동작할 thread를 변경하는 것이다. cycle 단위로 switching이 수행되면 매우 큰 switching overhead가 당연해보인다. 따라서, Fine-grained Multithreading 방식은 thread swithching 동작을 수행할 hardware logic 이 포함된다. 이 logic으로 switching overhead를 매우 작게 만들어 수행한다. processor 내에 충분한 수의 레지스터를 설계하여, context switching이 수행될때, 레지스터에 대한 save/restore 동작이 필요없게 만드는 식이다.

Navigation of this blog:이 블로그 한눈에 보기

2017년 4월 8일 토요일

안드로이드에서 프로세스와 스레드 생성 과정

Linux프로세스 생성과 관련한 코드를 살펴보았으니, 이번에는 실제로 안드로이드(Android) 플랫폼에서의 프로세스 생성이 어떻게 이뤄지는지, 그 과정을 살펴보도록 하자. 안드로이드에서의 프로세스(Process) 생성과 스레드(Thread) 생성에 관련한 각각의 예를 살펴보자.

안드로이드에서의 프로세스(Process) 생성 안드로이드에서의 프로세스 생성에 자주 사용되는 함수는 Java의 표준 라이브러리인 Runtime을 이용한 실행이다. Runtime.exec() 를 통해서 Process 를 생성하고 Process는 stdout로 Process가 실행된 결과를 전달한다. 이미 이전 글에서 Linux 는 프로세스 생성에 fork-and-exec 모델에 대해 알아보았다. 시스템 콜 함수인 fork() 함수와 exec() 함수를 호출해서 외부 프로세스를 실행한다.

안드로이드에서는 아직 vfork() 함수를 사용하고 있다.(이전 글에서 vfork() 함수는 서서히 없어질 것처럼 기재했었지만..) vfork() 함수는 부모 프로세스와 같은 자식 프로세스를 생성하고, 메모리 공간은 공유하기 때문에, 부모 프로세스는 exec() 함수가 호출될때까지 잠시 대기(sleep)한다. exec() 함수는 하위 프로세스가 실행할 파일을 읽어 메모리 이미지를 변경하고 새로운 프로그램을 실행한다. 아래에서 보이는 예제에서는 ping 명령어 실행이 이뤄졌다. vfork() 함수 호출 후에, exec() 함수를 호출하면 프로세스를 생성했던 부모 프로세스는 sleep에서 깨어나 이전에 실행했던 프로세스를 계속 실행하며, 새로이 fork된 자식 프로세스(이경우는 ping 명령어)는 새로운 메모리 공간에서 실행을 시작한다.

Runtime.exec() 호출 시, JAVA library 단에서 native 단 호출까지 함수 콜을 아래 모두 표시해두었다. UNIXProcess_md.c 파일에서 UNIXProcess_forkAndExec 함수를 보면 실제 프로세스 생성에 사용되는 vfork 와 exec 함수 system call 호출을 확인할 수 있다.

fork process on android

안드로이드에서의 스레드(Thread) 생성 안드로이드에서의 스레드 생성에 대해 살펴보자. 아래 예는 Thread를 생성하고 start로 Thread를 실행했을 때의 함수 호출을 표시해두었다. Thread start 호출 시, 안드로이드 art 의 thread.cc 파일에서 pthread_create 함수를 이용하여 thread를 생성한다. pthread는 POSIX 스레드(POSIX Threads)의 약자로, 모든 유닉스 계열 POSIX 시스템에서, 일반적으로 이용되는 표준 라이브러리이다. 실제로 thread를 생성하는 부분은 pthread_create 함수 안에 clone 호출로 이뤄져있다. Clone 함수 호출 시, 사용되는 flags들도 눈여겨보자. 안드로이드에서의 thread 생성 시, 아래 flag가 설정되어 clone system call로 전달되는 것이다.

fork thread on android

안드로이드 프로세스(Process) 생성과 스레드(Thread) 생성에 관련한 각각의 예를 살펴보았다. 실제로 함수 콜을 따라가면서, 함수들을 살펴보면, 좀 더 깊은 이해를 할 수 있다.

Navigation of this blog:이 블로그 한눈에 보기

2017년 2월 8일 수요일

fork, vfork, clone 차이점과 exec 함수

앞에서 fork 함수의 프로세스 생성 과정을 확인해보았다. 이번에는 리눅스 시스템에서의 프로세스 생성을 위한 fork, vfork, clone 시스템콜의 차이점과 exec 함수가 갖는 의미를 살펴보겠다.

1. fork

fork는 새로운 프로세스를 만들 때 기존 프로세스를 복제하는 방식을 사용하며 이때 fork를 호출한 부모 프로세스(parent process)를 원본으로 삼아 새로 복제하여 자식 프로세스(child process)를 만든다. (fork를 호출한 프로세스가 부모 프로세스, fork에 의해서 생성된 새로운 프로세스를 자식 프로세스)

fork는 자식 프로세스 생성과 동시에 필요한 메모리 영역을 할당하고 부모 프로세스의 메모리 영역을 모두 자식 프로세스의 메모리 공간으로 복사합니다. 하지만 fork가 부모 프로세스 메모리 공간을 모두 복사 하는 것은 비효율적인 오래 전 방식이며 현재 리눅스의 fork는 copy-on-write 기법을 사용하도록 개선되었다. Copy-on-write 기법은 자식 프로세스가 부모 프로세스의 메모리 공간을 모두 복사하는 것이 아니고, 동일 메모리 공간을 참조하고 있다가 변경사항이 발생할 경우에만 복사 하도록 구현되어 있다. 현재 리눅스의 fork가 Copy-on-write 기법을 도입하면서, 아래 설명할 vfork 의 장점이 많이 사라진 상태이다.

2. vfork

위에서 설명할fork 함수의 사용법을 살펴보면, 왜 vfork가 탄생하게 되었는지를 이해할 수 있게 된다. fork 함수는 주로 fork함수 실행 직후에 exec 계열 함수를 호출하는 방식으로 사용된다. exec 계열 명령은 현재 프로세스 실행 이미지를 다른 파일로 교체 시키는 기능이다. exec가 실행되면 기존 메모리는 모두 해제되고, file, mask, pid 등의 정보만 유지된 채 다른 실행 파일 이미지로 교체된다. 쉽게 말해 다른 실행 파일이 실행 되는 것이다. 이렇게 fork 후에 exec가 연속해서 호출되는 과정을 fork-and-exec모델이라고 부른다. 그런데 fork를 하면서 복제되었던 메모리가 곧바로 exec를 하면서 해제 되므로 무의미한 메모리 복제과정, 즉 오버헤드가 존재 하게 된다. fork-and-exec 방식의 오버헤드를 제거하려면 메모리 복제를 피하도록 설계 해야만 했다. 하지만 문제는 fork후에 exec 호출할 것인지 아닌지를 예측할 수 있는 방법은 없으며, 결국 프로그래머 용도에 fork-and-exec인 경우라면 메모리 복제를 하지 않는 새로운 함수를 쓰도록 대안이 제시되었다. 그 결과 실험적인 유닉스인 BSD3에서 vfork라는 함수가 탄생되었다.

자식 프로세스가 생성되면서 부모 프로세스 메모리, 파일 기술자 테이블 등을 복사하여 프로세스를 구성한다. 하지만, 자원을 복사하는데 걸리는 시간 때문에 프로세스 생성까지 오랜 시간이 걸렸고, 우리는 vfork가 fork의 무의미한 메모리 복제과정을 회피하기 위해 고안된 것이라는 것을 알고 있다. vfork 는 부모 프로세스의 메모리를 복제하는 대신에, 메모리를 공유하는 방법을 선택했다. fork는 광역과 지역 메모리 공간까지 똑같은 복사본을 만들고 부모와 자식이 서로 다른 메모리 공간을 사용하지만, 단점을 보완하기 위해서 vfork는 프로세스만 만들고 부모의 메모리 공간을 그대로 이용한다.(부모와 자식이 메모리 공간을 공유)

vfork는 부모프로세스 와 주소공간을 공유하고, 메모리 주소 공간에 대한 복사가 이루어지지 않기 때문에, 기존 fork보다 빠르게 프로세스를 생성할 수 있다. 하지만 자원을 공유하기 때문에, 자식 프로세스가 실행되어 변수들을 수정하기 시작하면, 부모 프로세스는 영향을 받게된다. 자원에 대한 race condition이 발생하게 되는 것이다. vfork는 이 문제를 해결하기 위해서 부모 프로세스는 자식프로세스가 exit 하거나 execve가 호출되지 전까지 SLEEP 상태로 대기시킨다. 즉 자식프로세스가 실행이 완료되어 exit를 실행하거나 exec를 호출하여 다른 프로그램을 실행하고 종료될 때까지 부모 프로세스는 계속 기다리고 있게 된다. vfork 를 사용하는 경우에 execve를 바로 호출 하지 않는 경우라면 자식 프로세스에서 수정한 광역변수나 지역변수들이 부모 프로세스에 영향을 미치기 때문에, 이를 고려하여 코딩 하여야 한다. 이점은 많이 이들이 vfork 가 위험하다고 보는 이유이기도 하다.

위에 언급한 것과 같이fork가 전체 메모리 주소 공간을 복사한다는 것은 예전 방식이고 현재 리눅스에서는 fork는 copy-on-write방식을 사용하여 프로세스 생성 시 모든 자원을 복사하는 것이 아니고 변경사항이 생길 경우에만 복사하도록 구현되어 있다. 따라서 현재 vfork가 갖는 장점은 부모 프로세스 페이지 테이블을 복사 하지 않는 것 뿐이다. 또한 성능에 대한 장점도 fork 함수에 copy-on-write 방식이 구현된 후로는 차이가 없어져서 현실적으로 vfork는 이점은 없어졌고, 자식 프로세스가 종료되거나 exec로 교체되기 전까지 부모 프로세스가 대기 상태로 기다려야만 하는 부작용 등만 남게 되었다.

따라서, 많은 관련 문서에서는 더 이상 vfork의 사용을 중지하기를 권고하고 하고 있다. POSIX 표준에서는 fork-and-exec 방식을 이용하여 표준 함수posix_spawn를 만들었다. 아직 많은 부분에서 vfork는 사용되고 있지만, 시간이 흘러감에 따라 점차 vfork는 퇴출되거나 호환성을 위해 남겨두지만 fork 로 완전 대체될 가능성도 있다.

3. clone

clone의 경우는 용도나 특성에 있어서 위의 두 함수와 살짝 차이가 존재한다. 이미 process descriptor 인 task_struct구조체를 살펴보면서, 리눅스 커널에서는 스레드를 위한 구조체가 따로 존재하지 않고 프로세스와 스레드의 구분을 위해 약간 다른 처리를 한다고 확인했다. clone은 프로세스를 생성하긴 하나, 용도 상 프로세스 생성보다는 스레드 생성의 의미에 가깝다. 리눅스에는 실제 스레드라는 것이 없고, clone함수를 이용하여 프로세스를 생성하면, 자식 프로세스가 부모 프로세스의 메모리 영역을 공유 한다. 즉 fork는 별도의 공간을 할당한 뒤 부모 프로세스 영역의 값을 복사하는 형식인 것에 반해 clone은 메모리 공간 자체를 공유한다. 물론 코드 영역도 공유한다. 이것이 가지는 의미는 자식 프로세스에서 어떤 메모리 영역의 값을 변경시키면 부모 프로세스에서도 그 영역을 공유하므로 부모 프로세스 직접적으로 영향을 준다는 사실이며, 이것이 곧 스레드의 특성과 매우 흡사합니다. 대개, 리눅스에서는 fork로 프로세스를 생성하고 clone 으로 스레드를 생성한다고 받아드려도 되겠다.

4. exec

exec 함수는 위의 fork 함수를 살펴보면서 보면서 이미 그 의미를 살짝 확인했다. (보통 Exec 함수는 execve를 포함한 exec함수군으로 표현한다.) exec함수는 사용하던 공간을 해제하고 새로운 공간을 실행 가능한 바이너리를 로드하고 실행한다. 새로운 스택을 초기화하고 excutable entry point를 전달하여 실행한다. exec 함수는 보통 fork-and-exec 방식(UNIX process management model에서 일컫는)으로 사용된다. 어떤 프로세스가 exec를 호출하면 이 프로세스 메모리 공간을 해제하고 새 실행 파일을 로드하고 실행한다. 이렇게 되어버리면 exec를 호출한 프로세스 공간은 새 프로세스로 교체되고, exec를 호출한 프로세스는 실행이 중지된다. 기존 프로세스의 실행 중지를 회피하기 위한 방법이 fork-and-exec 방식인 것이다. 새로운 프로세스를 생성하고 그 프로세스에서 exec 함수를 실행해서 새로운 프로세스를 실행하는 것이다. 이 방식을 사용하여 부모 프로세스와 자식 프로세스가 모두 실행이 가능한 것이다.

Navigation of this blog:이 블로그 한눈에 보기

2017년 2월 4일 토요일

fork 함수와 process 생성

리눅스는 새로운 프로세스와 스레드 생성을 fork (=_do_fork)함수를 이용하여 수행한다. fork 는 현재 태스크(프로세스)를 복제하여 자식 프로세스를 만든다. fork를 수행하는 프로세스의 task_struct 자료구료를 복사하여 새로운 프로세스(혹은 스레드)를 만드는 것이다. 이런 경우 원래 프로세스(fork 를 수행한 프로세스)는 부모 프로세스(parent process)가 되며, 새로운 프로세스는 자식 프로세스(child process)가 된다.

이렇게 만들어진 프로세스는 새로운 pid를 부여받으며, 이때 부모의 아이디는 ppid에 저장된다. 한 프로세스는 자식 프로세스를 여러 개 생성할 수 있으며, 자식 프로세스들끼리는 부모가 같은 형제프로세스(sibling process)가 된다. 자식 프로세스는 부모 프로세스의 task_struct 를 복사하여 만들어진다. 따라서 상속되지 않는 지연된 시그널과 같은 일부 자원과 통계수치를 제외하고는 그 부모와 동일한 값을 갖는다.

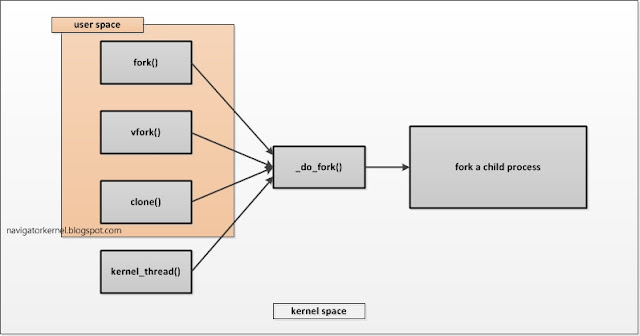
프로세스 생성 fork 커널 thread

user space 레벨에서 프로세스 생성을 위하여 커널 단에서는 세가지 시스템 콜을 제공하며, 이를 통하여 프로세스 생성을 가능케 한다. 3가지 시스템콜은 fork, vfork, clone이 되겠다. kernel space 레벨에서도 특정한 작업을 위하여 커널 스레드(kernel thread)를 만드는 경우가 있는데, 이를 위해 kernel_thread 함수를 제공하고 있다 kernel_thread 함수는 커널 함수인 _do_fork 함수를 직접 호출하여 스레드를 생성 실행한다.

user space 에서 프로세스 생성은 fork, vfork, clone 3가지 시스템콜 중에 하나로 수행되며, kernel space 에서 프로세스 생성은 kernel_thread 함수가 _do_fork 를 직접 호출하여 수행된다. 4가지 방식은 모두 _do_fork 함수를 호출하는 점은 동일하며, 호출할때 arg 설정으로 그 차이점이 발생한다.

pid_t kernel_thread(int (*fn)(void *), void *arg, unsigned long flags)
{
    return _do_fork(flags|CLONE_VM|CLONE_UNTRACED, (unsigned long)fn,
        (unsigned long)arg, NULL, NULL, 0);
}

SYSCALL_DEFINE0(fork)
{
#ifdef CONFIG_MMU
    return _do_fork(SIGCHLD, 0, 0, NULL, NULL, 0);
#else
    /* can not support in nommu mode */
    return -EINVAL;
#endif
}

SYSCALL_DEFINE0(vfork)
{
    return _do_fork(CLONE_VFORK | CLONE_VM | SIGCHLD, 0,
            0, NULL, NULL, 0);
}

SYSCALL_DEFINE5(clone, unsigned long, clone_flags, unsigned long, newsp,
         int __user *, parent_tidptr,
         int __user *, child_tidptr,
         unsigned long, tls)
{
    return _do_fork(clone_flags, newsp, 0, parent_tidptr, child_tidptr, tls);
}

위의 4가지 방식의 _do_fork 함수 호출 소스를 살펴보자. #define 관련한 소스는 상당부분 삭제하였다.

fork 시스템콜을 보면 SIGCHLD flag 설정을 제외하면, 추가적인 설정은 없다. SIGCHLD flag의 의미는 자식 프로세스가 종료 될 때 부모 프로세스에게 SIGCHLD 시그널을 보내라는 설정이다. 즉, 해당 flag 설정이 되어 있으면, 프로세스 exit 수행 시에 SIGCHLD 시그널이 부모 프로세스에게 전달된다.

kernel_thread 함수와 vfork 함수는 CLONE_VM가 설정된다. CLONE_VM는 새로 생성되는 자식 프로세스와 부모 프로세스 간에 메모리 공간을 공유하겠다는 설정이다. kernel thread가 각자의 메모리 공간이 존재하지 않는 점은 해당 flag 설정 때문이다. 또한, clone에는 CLONE_VM 설정이 없지만, clone_flags 를 arg 로 받아오기 때문에, 얼마든지 설정이 가능하고, 많은 곳에서 그렇게 사용하고 있다. 4가지 호출 방식의 비교는 뒤에서 다시 세부적으로 하기로 하겠다.

fork vfork clone kernel_thread _do_fork

_do_fork 함수는 크게 copy_process함수와 wake_up_new_task함수 호출 부분으로 나뉜다. copy_process함수에서는 프로세스 생성을 위한 초기화 작업들이 이뤄진다. 부모 프로세스의 task_struct 와 thread_info 구조체를 복사하고 필요한 부분은 초기화하여, execution 을 위한 준비를 한다. wake_up_new_task 함수는 새로이 생성한 task_struct 를 scheduler 쪽에 알려주는 역할을 한다. 새로운 process 생성을 완료하고 scheduler에 알려서, runqueue에 등록/실행될 수 있도록 하는 것이다.

copy_process 함수가 하는 일을 크게 나누어 보면 아래와같다.
1. Check clone_flags : 인자로 넘어온 clone_flags를 확인한다. 리눅스 구현 상 허용되지 못하는 flag 설정이 시스템콜을 통하여 전달될 수 있다. 이를 걸러내기 위한 확인 작업이 되겠다.
2. dup_task_struct : 프로세스의 기본 구성이 되는 task_struct 와 thread_info 구조체를 생성하고, 부모 프로세스의 구조체로부터 복사한다. 커널은 task_struct 와 thread_info 구조체를 슬랩 할당자(slab allocator)를 통해 메모리를 할당한다. 할당된 메모리에 부모 프로세스의 정보를 복사하고, 공유될 수 없는 정보들은 초기화한다.
3. check max number of processes : rlimit (Resource limit ID)값을 확인하여, 프로세스를 생성하는 user의 최대허용 프로세스 개수를 넘지 않도록 한다.
4. Initializing time stamps and irqflags : 프로세스 관련 정보 중 time stamp 통계 값이나 irqflags 등을 초기화한다. 이런 정보들은 프로세스 간에 공유가 불가능하다.
5. Scheduler related setup & Copy process info : sched_fork함수를 호출하여 scheduler 쪽에서 해당 task_struct 에 대한 초기화 작업을 한다. Scheduler 에서는 해당 프로세스를 TASK_NEW state로 설정하고, priority 값 등을 초기화하는 작업이 이뤄진다. copy_fs 는 file system 정보를 복사하며, copy_files 는 현재 오픈되어 있는 file 정보를 복사한다. 각 함수 안에서는 clone_flags를 확인하여, 각 CLONE_FS, CLONE_FILES 비트가 설정되어 있어야 실제 복사가 이뤄진다. 프로세스 메모리 공간의 복사를 수행하는 copy_mm 함수도 호출되며, signal 복사도 이뤄지는 등 여러 함수가 호출되니, 한번 쭉 보기 바란다.

copy_process 함수는 마무리 작업을 완료한 후 새로이 생성된 task_struct 구조체를 반환한다. 반환된 task_struct 구조체는 위에서 이야기한대로 scheduler의 wake_up_new_task 함수에 인자로 담아서 전달하면, runqueue에 등록/실행될 수 있도록 준비하는 것이다.

Navigation of this blog:이 블로그 한눈에 보기

2017년 1월 25일 수요일

process descriptor 와 thread_info

커널은 프로세스 목록을 태스크 리스트(tast list)라고 하는 연결 리스트로 저장한다. 각 항목이 task_struct 구조체인 연결 리스트이다. 리눅스 시스템에서 생성된 전체 프로세스들이 모두 저장되기 때문에, 어느 한 task_struct를 선택하여 리스트를 따라가보면 전체 리스트를 탐색하고 다시 본인 task_struct 자리로 돌아온다. 모든 프로세스는 PID가 1 인 init_task 라는 initial task로부터 생성되어진 자식들이다. for_each_process 함수 코드를 보면 init_task부터 시작하여 모든 프로세스를 순회하는 코드를 확인할 수 있다.

이 구조체를 프로세스 서술자(process descriptor)라고 부르며, 프로세스 서술자에는 사용 중인 파일, 프로세서의 주소 공간, 대기 중인 시그널, 프로세스의 상태 등 실행 중인 프로그램을 설명하는 많은 정보가 들어있기 때문에 용량이 큰 구조체이다. 32비트 시스템에서는 약 1.7KB이며, 64비트 시스템에서는 약 3.2KB 정도이다.

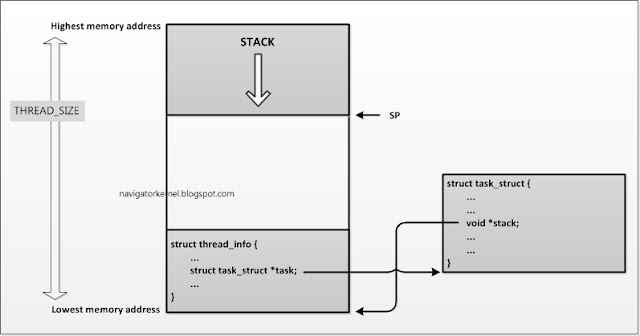
프로세스 별로 프로세스 서술자를 할당하여, 프로세스에 관한 많은 정보를 저장한다고 하였다. 하지만 여기에 프로세스에 관련한 아직 말하지 않은 중요한 정보가 더 존재한다. 바로, 프로세스 커널 스택(process kernel stack)이다. 이 프로세스 커널 스택은 THREAD_SIZE 만큼의 메모리 크기로 할당되며, struct thread_info를 포함한다. 커널 스택이 상위 메모리 주소에서 아래로 스택을 쌓아사면서 자라나고, 그 반대 방향의 끝에는 thread_info가 자리하고 있다.

커널 스택과 thread_info task_struct 관계

THREAD_SIZE 는 ARM architecture에서 보통 32비트는 0x2000 를 사용했고, 64비트로 넘어오면서 0x4000로 2배로 커졌다.(아래 커널 코드 설명도 모두 ARM architecture 기반으로 설명하였다.)

프로세스에서 프로세스 서술자(혹은 커널 스택)에 접근하는 일은 매우 빈번한 일이기 때문에 latency가 없이 접근 가능한지 여부는 매우 중요하다. 이를 위해 ARM architecture에서는 sp 레지스터로 스택포인터(stack pointer)주소를 저장하고, 이를 참조하여 매우 빠르게 현재 스택 주소와 task_struct 를 접근 가능하다.

thread_info task_struct current_thread_info THREAD_SIZE

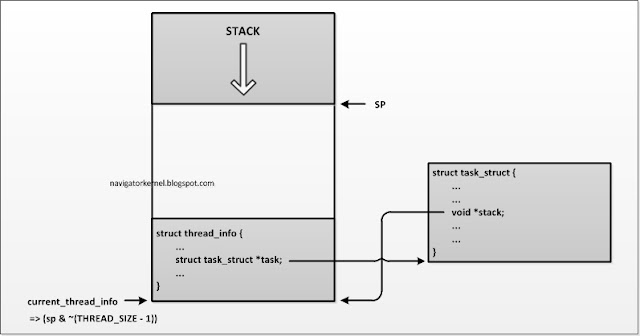
리눅스 커널 코드에서 sp, task_struct 와 thread_info 를 어떻게 접근하는 위 그림을 참고하여 각 코드를 확인해보자.

register unsigned long current_stack_pointer asm ("sp");

현재 스택 포인트가 가리키는 주소는 sp 레지스터를 읽어오면 확인 가능하다. 커널 코드에서 스택의 움직임에 따라(스택이 자라나고 줄어듦에 따라) sp 가 가리키는 주소는 계속 관리되고 있기 때문에, 항상 참조 가능하다.

static inline struct thread_info *current_thread_info(void)
{
    return (struct thread_info *)
        (current_stack_pointer & ~(THREAD_SIZE - 1));
}

thread_info 는 sp 레지스터에 하위 비트를 지워버리는 방법으로 참조 가능하다. THREAD_SIZE 만큼의 하위 비트를 0로 마스킹해버면, STACK 의 최하위 주소인 thread_info 의 주소를 얻어낼 수 있다. 위 current_thread_info 인라인 함수를 사용하면, 커널 코드에서 언제든지 현재 running 중인 thread 의 thread_info 정보를 가져올 수 있다.

#define get_current() (current_thread_info()->task)
#define current get_current()

task_struct 구조체는 thread_info->task 포인터 주소를 참고하는 방법으로 참조 가능하다. sp 를 이용하여 현재의 thread_info 를 빠르게 가져올 수 있으니, thread_info 의 멤버 중 task_struct 를 가리키고 있는 task 포인트를 이용하는 것이다. 커널 코드에서 current 라는 매크로로 현재 running 중인 process descriptor(task_struct)를 가져올 수 있다. 커널 코드를 보다보면 current 매크로를 사용하는 부분이 많이 나오는데, running 중인 process 정보를 가져오는 것이라고 생각하면 된다.

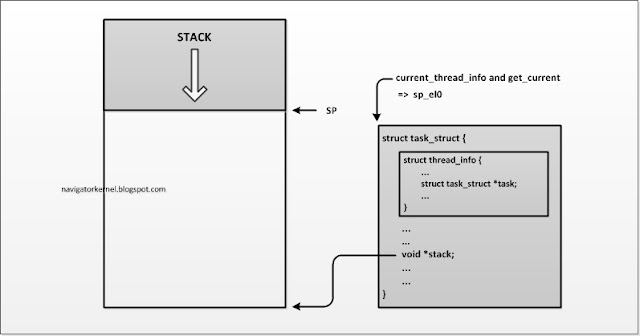
지금까지 살펴 본 위의 코드 내용은 ARM architecture v7 까지의 이야기이다. 즉, 32비트 계열에서의 주소 참조 방식이며, ARMv8 (64bit - Aarch64)에서는 sp_el0 레지스터를 하나 더 할당하여, thread_info 의 주소를 저장한다. 아래 그림을 참고 하자.


ARMv8 에서는 sp 는 스택의 현재 주소를 가리키며, sp_el0 는 thread_info 주소를 가리킨다. 따라서 current_thread_info 를 수행할때, sp 값의 마스킹없이 sp_el0 값을 읽어서 바로 참조하면 된다. thread_info 주소값 참조를 위해 레지스터가 하나 더 추가된 것이다.
/*
 * struct thread_info can be accessed directly via sp_el0.
 */
static inline struct thread_info *current_thread_info(void)
{
    unsigned long sp_el0;

    asm ("mrs %0, sp_el0" : "=r" (sp_el0));

    return (struct thread_info *)sp_el0;
}

sp_el0 레지스터의 추가로, current_thread_info 를 가져올때, 항상 실행하던 THREAD_SIZE 의 마스킹 동작이 없어졌다. 이점은 작은 변화이지만, 코드의 호출 빈도를 생각해보면 큰 이점이다.

위에서 확인한 task_struct 와 thread_info 의 참조 관계는 상당히 오랜시간을 지켜왔다. 하지만 이 관계를 깨는 변경 사항이 커널 4.9 에 반영(commit id : c65eacbe29) 되었다. THREAD_INFO_IN_TASK feature 이다. CONFIG_THREAD_INFO_IN_TASK 가 enable 되면 커널 스택에 포함되어 있던 thread_info 구조체 변수는 task_struct 속으로 들어간다.

CONFIG_THREAD_INFO_IN_TASK

위의 그림에서도 확인해보면, 커널 스택은 온전히 스택 데이터 만으로 채워지게 된다. task_struct 의 정의를 보면, thread_info 는 구조체의 맨 앞에 위치하도록 되어있다. task_struct 와 thread_info 접근을 동일한 주소값을 참조하여 접근하기 위함이다. 해당 주소값은 sp_el0 에 저장되어 있고, 해당 주소를 읽어서 task_struct 로 캐스팅하면 current task descriptor 를 접근할 수 있고, thread_info 로 캐스팅하면 thread_info 를 접근할 수 있다.

static __always_inline struct task_struct *get_current(void)
{
    unsigned long sp_el0;

    asm ("mrs %0, sp_el0" : "=r" (sp_el0));

    return (struct task_struct *)sp_el0;
}

sp_el0 레지스터를 읽어서, task_sturct 구조체로 캐스팅을 하면 current task_struct 구조체 변수가 된다.

#ifdef CONFIG_THREAD_INFO_IN_TASK
/*
 * For CONFIG_THREAD_INFO_IN_TASK kernels we need  for the
 * definition of current, but for !CONFIG_THREAD_INFO_IN_TASK kernels,
 * including  can cause a circular dependency on some platforms.
 */
#include 
#define current_thread_info() ((struct thread_info *)current)
#endif

current는 sp_el0 레지스터가 가리키는 주소라고 하였다. CONFIG_THREAD_INFO_IN_TASK 가 세팅되면, task_sturct 구조체에 thread_info 구조체가 맨 앞에 위치하기 때문에 둘을 참조하는 메모리 주소는 동일하다. 이 주소를 thread_info 로 캐스팅하면 current_thread_info를 참조할 수 있다.

Navigation of this blog:이 블로그 한눈에 보기
2017년 1월 22일 일요일

process vs thread - 차이점 알아보기

프로세스는 실행 중인 프로그램의 객체(instance)를 의미한다고 했다.
그럼, 아직 말하지 않은 thread는 무엇인가?

Thread 란 한 프로세스 내에서 동작되는 여러 실행의 흐름으로, 프로세스 내의 주소 공간이나 자원들을 대부분 공유하면서 실행되는 객체를 말한다. 근래의 대부분의 시스템은 multi thread program 이 기본이며, 이는 하나의 프로세스 내에 여러 개의 thread 들이 실행 가능하다는 의미이다.

기본적으로 하나의 process가 생성되면 하나의 thread가 같이 생성된다. 이를 mian thread라고 부르며, thread를 추가로 생성하지 않는 한 모든 프로그램 코드는 메인 thread에서 실행된다. 이 process 는 fork를 통해 child process를 가질 수 있으며 이를 multi thread 라고 한다. 리눅스에서 process 와 thread 를 구분을 하지 않는다. 둘 다 동일하게 task_struct 로 표현되며, process 와 thread 는 리눅스에서 둘 간이 구별되는 조금 다른 처리를 받을 뿐이다.

프로세스가 생성되고 그 프로세스 내의 쓰레드들은 프로세스 내의 자원을 공유하면서, 각 쓰레드의 프로그램을 실행한다. 리눅스 코드 영역과 라이브러리를 프로세스 내부로는 공유하며, 각 쓰레드들은 실행 위치를 나타내는 PC(Program Counter), register 정보들을 포함한 스택, 변수 할당으로 채워지는 데이터 세그먼트 각각 저장관리한다. 각 쓰레드들이 독립적으로 실행한다는 점을 생각하면, 실행 정보와 관련한 것들은 각각 정장되어 있어야 한다는 점은 너무 당연한 것이다.

아래 프로세스와 쓰레드 간의 자원 공유 상태를 그림으로 표현해봤다.


쓰레드는 프로세스 내에서 코드, 전역 변수, 파일등을 공유한다.(리눅스의 clone 함수로 스레드가 생성될때, flag에 의해 공유가 얼마정도 허용되는지를 정한다.) 이는 프로그램을 구현할 때, 매우 중요한 요소이다. 매번 프로세스를 생성하는 것보다 스레드를 생성하는 것이 효율적이며, 특히 멀티 프로세서 환경에서는 더욱 효과가 탁월하다. 스레드 간의 통신이 필요한 경우 전역 변수를 이용하여 쉽게 데이터를 주고받을 수 있다. 프로세스 간의 통신은 IPC 등의 인터페이스가 필요하며, 이는 훨씬 비효율적인 일이 될 것이다.
스레드의 장점을 정리하면 다음과 같다.  
- 응답성 : 사용자와의 대화형 프로그램을 스레드로 구현시, 상호작용에 대한 부분을 스레드로 구현하여 응답성이 뛰어남
- 자원 공유 : 프로세스 간의 통신에 큰 자원이 필요하다. 스레드 간에는 자원 공유가 가능하여, 이는 큰 이점임
- 경제성 : 프로세스를 생성하는 것보다 스레드를 생성하는 시간이 적게 걸림
- 규모 가변성 : multi processor 에서의 multi threading 은 병렬성을 증가 시킴 

이와 같이 프로세스 내의 스레드 간에는 전역 변수 및 메모리 공간을 공유할 수 있다. 이는 큰 장점이지만, 개발자로써는 큰 문제의 여지가 생긴다. 공유 되는 자원은 항상 충돌의 문제가 생긴다. 따라서 스레드 간에 통신 간에 충돌 문제가 발생하지 않도록 동기화 설계를 잘 고려하여 문제가 발생하지 않도록 하여야 한다. 동기화가 고려되지 않은 변수나 메모리의 공유는 오류를 발생시키며, multi thread 환경에서 자칫 디버깅이 어려운 상황을 만들 수 있다.

리눅스 커널에서는 이런 동기화를 해결하기 위한 여러 매커니즘을 제공한다. 이는 뒤에 다시 정리하기로 한다.

Navigation of this blog:이 블로그 한눈에 보기

2017년 1월 21일 토요일

process 개념 알아보기

Process management 에 대해 확인해보기 전에,  process 개념부터 확인해보자.

살짝  wikipedia 에 있는 정의를 빌려보자면 아래와같다.

In computing, a process is an instance of a computer program that is being executed. It contains the program code and its current activity. Depending on the operating system (OS), a process may be made up of multiple threads of execution that execute instructions concurrently.

프로세스는 실행 중인 프로그램으로, 커널 내부 에이터, 프로세서 상태, 메모리 주소 공간 등의 자원을 포함한다. 간단히 생각하면 실행(executing)을 하기 위한 모든 정보를 담고 있는 객체(instance)로 보는 것이 좋을 것이다.


리눅스에서는 process 정의를 task_struct 라는 구조체로 담아낸다.  이를 프로세스 서술자(process description)이라고 부른다. 이 안의 멤버들로 프로세스 실행을 하기 위한 많은 정보들을 담고 있는 것이다.
몇가지만 살펴보면 아래와같다.
state -> process 의 동작 상태
on_cpu -> SMP 에서의 현재 process 의 동작 cpu 번호
prio, static_prio, normal_prio; -> scheduling 에서의 priority 값
struct sched_entity se; -> sched entity 정보
pid_t pid; -> pid 값


task_struct 의 각 세부내역은 후에 코드를 볼때, 필요부분을 자세히 살펴보기로 하고, 아래는 구조체 전체 내역이다.


struct task_struct {
#ifdef CONFIG_THREAD_INFO_IN_TASK
 /*
  * For reasons of header soup (see current_thread_info()), this
  * must be the first element of task_struct.
  */
 struct thread_info thread_info;
#endif
 volatile long state; /* -1 unrunnable, 0 runnable, >0 stopped */
 void *stack;
 atomic_t usage;
 unsigned int flags; /* per process flags, defined below */
 unsigned int ptrace;

#ifdef CONFIG_SMP
 struct llist_node wake_entry;
 int on_cpu;
#ifdef CONFIG_THREAD_INFO_IN_TASK
 unsigned int cpu; /* current CPU */
#endif
 unsigned int wakee_flips;
 unsigned long wakee_flip_decay_ts;
 struct task_struct *last_wakee;

 int wake_cpu;
#endif
 int on_rq;

 int prio, static_prio, normal_prio;
 unsigned int rt_priority;
 const struct sched_class *sched_class;
 struct sched_entity se;
 struct sched_rt_entity rt;
#ifdef CONFIG_CGROUP_SCHED
 struct task_group *sched_task_group;
#endif
 struct sched_dl_entity dl;

#ifdef CONFIG_PREEMPT_NOTIFIERS
 /* list of struct preempt_notifier: */
 struct hlist_head preempt_notifiers;
#endif

#ifdef CONFIG_BLK_DEV_IO_TRACE
 unsigned int btrace_seq;
#endif

 unsigned int policy;
 int nr_cpus_allowed;
 cpumask_t cpus_allowed;

#ifdef CONFIG_PREEMPT_RCU
 int rcu_read_lock_nesting;
 union rcu_special rcu_read_unlock_special;
 struct list_head rcu_node_entry;
 struct rcu_node *rcu_blocked_node;
#endif /* #ifdef CONFIG_PREEMPT_RCU */
#ifdef CONFIG_TASKS_RCU
 unsigned long rcu_tasks_nvcsw;
 bool rcu_tasks_holdout;
 struct list_head rcu_tasks_holdout_list;
 int rcu_tasks_idle_cpu;
#endif /* #ifdef CONFIG_TASKS_RCU */

#ifdef CONFIG_SCHED_INFO
 struct sched_info sched_info;
#endif

 struct list_head tasks;
#ifdef CONFIG_SMP
 struct plist_node pushable_tasks;
 struct rb_node pushable_dl_tasks;
#endif

 struct mm_struct *mm, *active_mm;
 /* per-thread vma caching */
 u32 vmacache_seqnum;
 struct vm_area_struct *vmacache[VMACACHE_SIZE];
#if defined(SPLIT_RSS_COUNTING)
 struct task_rss_stat rss_stat;
#endif
/* task state */
 int exit_state;
 int exit_code, exit_signal;
 int pdeath_signal;  /*  The signal sent when the parent dies  */
 unsigned long jobctl; /* JOBCTL_*, siglock protected */

 /* Used for emulating ABI behavior of previous Linux versions */
 unsigned int personality;

 /* scheduler bits, serialized by scheduler locks */
 unsigned sched_reset_on_fork:1;
 unsigned sched_contributes_to_load:1;
 unsigned sched_migrated:1;
 unsigned sched_remote_wakeup:1;
 unsigned :0; /* force alignment to the next boundary */

 /* unserialized, strictly 'current' */
 unsigned in_execve:1; /* bit to tell LSMs we're in execve */
 unsigned in_iowait:1;
#if !defined(TIF_RESTORE_SIGMASK)
 unsigned restore_sigmask:1;
#endif
#ifdef CONFIG_MEMCG
 unsigned memcg_may_oom:1;
#ifndef CONFIG_SLOB
 unsigned memcg_kmem_skip_account:1;
#endif
#endif
#ifdef CONFIG_COMPAT_BRK
 unsigned brk_randomized:1;
#endif

 unsigned long atomic_flags; /* Flags needing atomic access. */

 struct restart_block restart_block;

 pid_t pid;
 pid_t tgid;

#ifdef CONFIG_CC_STACKPROTECTOR
 /* Canary value for the -fstack-protector gcc feature */
 unsigned long stack_canary;
#endif
 /*
  * pointers to (original) parent process, youngest child, younger sibling,
  * older sibling, respectively.  (p->father can be replaced with
  * p->real_parent->pid)
  */
 struct task_struct __rcu *real_parent; /* real parent process */
 struct task_struct __rcu *parent; /* recipient of SIGCHLD, wait4() reports */
 /*
  * children/sibling forms the list of my natural children
  */
 struct list_head children; /* list of my children */
 struct list_head sibling; /* linkage in my parent's children list */
 struct task_struct *group_leader; /* threadgroup leader */

 /*
  * ptraced is the list of tasks this task is using ptrace on.
  * This includes both natural children and PTRACE_ATTACH targets.
  * p->ptrace_entry is p's link on the p->parent->ptraced list.
  */
 struct list_head ptraced;
 struct list_head ptrace_entry;

 /* PID/PID hash table linkage. */
 struct pid_link pids[PIDTYPE_MAX];
 struct list_head thread_group;
 struct list_head thread_node;

 struct completion *vfork_done;  /* for vfork() */
 int __user *set_child_tid;  /* CLONE_CHILD_SETTID */
 int __user *clear_child_tid;  /* CLONE_CHILD_CLEARTID */

 cputime_t utime, stime;
#ifdef CONFIG_ARCH_HAS_SCALED_CPUTIME
 cputime_t utimescaled, stimescaled;
#endif
 cputime_t gtime;
 struct prev_cputime prev_cputime;
#ifdef CONFIG_VIRT_CPU_ACCOUNTING_GEN
 seqcount_t vtime_seqcount;
 unsigned long long vtime_snap;
 enum {
  /* Task is sleeping or running in a CPU with VTIME inactive */
  VTIME_INACTIVE = 0,
  /* Task runs in userspace in a CPU with VTIME active */
  VTIME_USER,
  /* Task runs in kernelspace in a CPU with VTIME active */
  VTIME_SYS,
 } vtime_snap_whence;
#endif

#ifdef CONFIG_NO_HZ_FULL
 atomic_t tick_dep_mask;
#endif
 unsigned long nvcsw, nivcsw; /* context switch counts */
 u64 start_time;  /* monotonic time in nsec */
 u64 real_start_time; /* boot based time in nsec */
/* mm fault and swap info: this can arguably be seen as either mm-specific or thread-specific */
 unsigned long min_flt, maj_flt;

 struct task_cputime cputime_expires;
 struct list_head cpu_timers[3];

/* process credentials */
 const struct cred __rcu *ptracer_cred; /* Tracer's credentials at attach */
 const struct cred __rcu *real_cred; /* objective and real subjective task
      * credentials (COW) */
 const struct cred __rcu *cred; /* effective (overridable) subjective task
      * credentials (COW) */
 char comm[TASK_COMM_LEN]; /* executable name excluding path
         - access with [gs]et_task_comm (which lock
           it with task_lock())
         - initialized normally by setup_new_exec */
/* file system info */
 struct nameidata *nameidata;
#ifdef CONFIG_SYSVIPC
/* ipc stuff */
 struct sysv_sem sysvsem;
 struct sysv_shm sysvshm;
#endif
#ifdef CONFIG_DETECT_HUNG_TASK
/* hung task detection */
 unsigned long last_switch_count;
#endif
/* filesystem information */
 struct fs_struct *fs;
/* open file information */
 struct files_struct *files;
/* namespaces */
 struct nsproxy *nsproxy;
/* signal handlers */
 struct signal_struct *signal;
 struct sighand_struct *sighand;

 sigset_t blocked, real_blocked;
 sigset_t saved_sigmask; /* restored if set_restore_sigmask() was used */
 struct sigpending pending;

 unsigned long sas_ss_sp;
 size_t sas_ss_size;
 unsigned sas_ss_flags;

 struct callback_head *task_works;

 struct audit_context *audit_context;
#ifdef CONFIG_AUDITSYSCALL
 kuid_t loginuid;
 unsigned int sessionid;
#endif
 struct seccomp seccomp;

/* Thread group tracking */
    u32 parent_exec_id;
    u32 self_exec_id;
/* Protection of (de-)allocation: mm, files, fs, tty, keyrings, mems_allowed,
 * mempolicy */
 spinlock_t alloc_lock;

 /* Protection of the PI data structures: */
 raw_spinlock_t pi_lock;

 struct wake_q_node wake_q;

#ifdef CONFIG_RT_MUTEXES
 /* PI waiters blocked on a rt_mutex held by this task */
 struct rb_root pi_waiters;
 struct rb_node *pi_waiters_leftmost;
 /* Deadlock detection and priority inheritance handling */
 struct rt_mutex_waiter *pi_blocked_on;
#endif

#ifdef CONFIG_DEBUG_MUTEXES
 /* mutex deadlock detection */
 struct mutex_waiter *blocked_on;
#endif
#ifdef CONFIG_TRACE_IRQFLAGS
 unsigned int irq_events;
 unsigned long hardirq_enable_ip;
 unsigned long hardirq_disable_ip;
 unsigned int hardirq_enable_event;
 unsigned int hardirq_disable_event;
 int hardirqs_enabled;
 int hardirq_context;
 unsigned long softirq_disable_ip;
 unsigned long softirq_enable_ip;
 unsigned int softirq_disable_event;
 unsigned int softirq_enable_event;
 int softirqs_enabled;
 int softirq_context;
#endif
#ifdef CONFIG_LOCKDEP
# define MAX_LOCK_DEPTH 48UL
 u64 curr_chain_key;
 int lockdep_depth;
 unsigned int lockdep_recursion;
 struct held_lock held_locks[MAX_LOCK_DEPTH];
 gfp_t lockdep_reclaim_gfp;
#endif
#ifdef CONFIG_UBSAN
 unsigned int in_ubsan;
#endif

/* journalling filesystem info */
 void *journal_info;

/* stacked block device info */
 struct bio_list *bio_list;

#ifdef CONFIG_BLOCK
/* stack plugging */
 struct blk_plug *plug;
#endif

/* VM state */
 struct reclaim_state *reclaim_state;

 struct backing_dev_info *backing_dev_info;

 struct io_context *io_context;

 unsigned long ptrace_message;
 siginfo_t *last_siginfo; /* For ptrace use.  */
 struct task_io_accounting ioac;
#if defined(CONFIG_TASK_XACCT)
 u64 acct_rss_mem1; /* accumulated rss usage */
 u64 acct_vm_mem1; /* accumulated virtual memory usage */
 cputime_t acct_timexpd; /* stime + utime since last update */
#endif
#ifdef CONFIG_CPUSETS
 nodemask_t mems_allowed; /* Protected by alloc_lock */
 seqcount_t mems_allowed_seq; /* Seqence no to catch updates */
 int cpuset_mem_spread_rotor;
 int cpuset_slab_spread_rotor;
#endif
#ifdef CONFIG_CGROUPS
 /* Control Group info protected by css_set_lock */
 struct css_set __rcu *cgroups;
 /* cg_list protected by css_set_lock and tsk->alloc_lock */
 struct list_head cg_list;
#endif
#ifdef CONFIG_INTEL_RDT_A
 int closid;
#endif
#ifdef CONFIG_FUTEX
 struct robust_list_head __user *robust_list;
#ifdef CONFIG_COMPAT
 struct compat_robust_list_head __user *compat_robust_list;
#endif
 struct list_head pi_state_list;
 struct futex_pi_state *pi_state_cache;
#endif
#ifdef CONFIG_PERF_EVENTS
 struct perf_event_context *perf_event_ctxp[perf_nr_task_contexts];
 struct mutex perf_event_mutex;
 struct list_head perf_event_list;
#endif
#ifdef CONFIG_DEBUG_PREEMPT
 unsigned long preempt_disable_ip;
#endif
#ifdef CONFIG_NUMA
 struct mempolicy *mempolicy; /* Protected by alloc_lock */
 short il_next;
 short pref_node_fork;
#endif
#ifdef CONFIG_NUMA_BALANCING
 int numa_scan_seq;
 unsigned int numa_scan_period;
 unsigned int numa_scan_period_max;
 int numa_preferred_nid;
 unsigned long numa_migrate_retry;
 u64 node_stamp;   /* migration stamp  */
 u64 last_task_numa_placement;
 u64 last_sum_exec_runtime;
 struct callback_head numa_work;

 struct list_head numa_entry;
 struct numa_group *numa_group;

 /*
  * numa_faults is an array split into four regions:
  * faults_memory, faults_cpu, faults_memory_buffer, faults_cpu_buffer
  * in this precise order.
  *
  * faults_memory: Exponential decaying average of faults on a per-node
  * basis. Scheduling placement decisions are made based on these
  * counts. The values remain static for the duration of a PTE scan.
  * faults_cpu: Track the nodes the process was running on when a NUMA
  * hinting fault was incurred.
  * faults_memory_buffer and faults_cpu_buffer: Record faults per node
  * during the current scan window. When the scan completes, the counts
  * in faults_memory and faults_cpu decay and these values are copied.
  */
 unsigned long *numa_faults;
 unsigned long total_numa_faults;

 /*
  * numa_faults_locality tracks if faults recorded during the last
  * scan window were remote/local or failed to migrate. The task scan
  * period is adapted based on the locality of the faults with different
  * weights depending on whether they were shared or private faults
  */
 unsigned long numa_faults_locality[3];

 unsigned long numa_pages_migrated;
#endif /* CONFIG_NUMA_BALANCING */

#ifdef CONFIG_ARCH_WANT_BATCHED_UNMAP_TLB_FLUSH
 struct tlbflush_unmap_batch tlb_ubc;
#endif

 struct rcu_head rcu;

 /*
  * cache last used pipe for splice
  */
 struct pipe_inode_info *splice_pipe;

 struct page_frag task_frag;

#ifdef CONFIG_TASK_DELAY_ACCT
 struct task_delay_info *delays;
#endif
#ifdef CONFIG_FAULT_INJECTION
 int make_it_fail;
#endif
 /*
  * when (nr_dirtied >= nr_dirtied_pause), it's time to call
  * balance_dirty_pages() for some dirty throttling pause
  */
 int nr_dirtied;
 int nr_dirtied_pause;
 unsigned long dirty_paused_when; /* start of a write-and-pause period */

#ifdef CONFIG_LATENCYTOP
 int latency_record_count;
 struct latency_record latency_record[LT_SAVECOUNT];
#endif
 /*
  * time slack values; these are used to round up poll() and
  * select() etc timeout values. These are in nanoseconds.
  */
 u64 timer_slack_ns;
 u64 default_timer_slack_ns;

#ifdef CONFIG_KASAN
 unsigned int kasan_depth;
#endif
#ifdef CONFIG_FUNCTION_GRAPH_TRACER
 /* Index of current stored address in ret_stack */
 int curr_ret_stack;
 /* Stack of return addresses for return function tracing */
 struct ftrace_ret_stack *ret_stack;
 /* time stamp for last schedule */
 unsigned long long ftrace_timestamp;
 /*
  * Number of functions that haven't been traced
  * because of depth overrun.
  */
 atomic_t trace_overrun;
 /* Pause for the tracing */
 atomic_t tracing_graph_pause;
#endif
#ifdef CONFIG_TRACING
 /* state flags for use by tracers */
 unsigned long trace;
 /* bitmask and counter of trace recursion */
 unsigned long trace_recursion;
#endif /* CONFIG_TRACING */
#ifdef CONFIG_KCOV
 /* Coverage collection mode enabled for this task (0 if disabled). */
 enum kcov_mode kcov_mode;
 /* Size of the kcov_area. */
 unsigned kcov_size;
 /* Buffer for coverage collection. */
 void  *kcov_area;
 /* kcov desciptor wired with this task or NULL. */
 struct kcov *kcov;
#endif
#ifdef CONFIG_MEMCG
 struct mem_cgroup *memcg_in_oom;
 gfp_t memcg_oom_gfp_mask;
 int memcg_oom_order;

 /* number of pages to reclaim on returning to userland */
 unsigned int memcg_nr_pages_over_high;
#endif
#ifdef CONFIG_UPROBES
 struct uprobe_task *utask;
#endif
#if defined(CONFIG_BCACHE) || defined(CONFIG_BCACHE_MODULE)
 unsigned int sequential_io;
 unsigned int sequential_io_avg;
#endif
#ifdef CONFIG_DEBUG_ATOMIC_SLEEP
 unsigned long task_state_change;
#endif
 int pagefault_disabled;
#ifdef CONFIG_MMU
 struct task_struct *oom_reaper_list;
#endif
#ifdef CONFIG_VMAP_STACK
 struct vm_struct *stack_vm_area;
#endif
#ifdef CONFIG_THREAD_INFO_IN_TASK
 /* A live task holds one reference. */
 atomic_t stack_refcount;
#endif
/* CPU-specific state of this task */
 struct thread_struct thread;
/*
 * WARNING: on x86, 'thread_struct' contains a variable-sized
 * structure.  It *MUST* be at the end of 'task_struct'.
 *
 * Do not put anything below here!
 */
};

Navigation of this blog:이 블로그 한눈에 보기

2017년 1월 15일 일요일

리눅스 커널 소스 다운로드

커널 분석을 하기에 앞서 커널 소스를 다운로드 하여 커널 분석을 할 수 있는 준비를 해본다.
git 의 clone 커맨드로 아래와같이 kernel.org 의 stable 커널 소스를 다운로드 가능하다.

$ git clone git://git.kernel.org/pub/scm/linux/kernel/git/stable/linux-stable.git
$ cd linux-stable
<커널 소스 다운로드 화면>

소스 다운로드가 완료되면 끝.
이제 커널 코드 분석을 시작할 수 있다.

그외 참고 git repositories
kernel.org 에서 제공하는 git repository 목록을 확인 가능함
http://git.kernel.org/cgit

안드로이드(android) 소스 repository 다운로드

$ git clone https://android.googlesource.com/kernel/common.git

- 커널 분석을 시작하기 위한 준비사항
만약, 리눅스를 막 시작한 사람이라면 git, ctags, cscope, vi 대해서는 기본적인 사용법 정도는 꼭 알고 시작하는 것이 좋다.

Navigation of this blog:이 블로그 한눈에 보기